

Note: This is not a course for the one who is new to React Router. Rather this is for someone who has done at-least some amount of coding using React Router and who wants to know how React Router works. Let’s get into it. 😉
Prerequisites:
- React basics
- Basic understanding of React Router
Problems with the native routing system
Traditionally when a user clicks a link, which is linked to another path of the URL, a browser would load all files a-fresh (HTML, CSS, JS), and start to render the elements onto the screen. “What is the problem with this approach?”, one may ask. The problem is User Experience and redundant fetching of files.
For example, you are on a webpage https://example.com/react-router/ch-1 and there is a next icon which loads the next chapter. When the next icon is clicked a request goes to the server with the URL https://example.com/react-router/ch-2. The server will respond with the HTML file and the browser will reload to render this file. The HTML file may have links to CSS and JS files, those files will also be downloaded. The process takes a significant amount of time, in the meantime the browser window is blank. It is bad for User Experience. This is called server side routing because you are requesting a whole new page (HTML) from the server rather than just the data, which updates the existing UI.
What does the React Router do? How does it solve the problem?
React Router does client side routing. Client side routing allows your app to update the URL from a link click without making another request for another document from the server. Instead, your app can immediately render some new UI and make necessary fetch calls to update the page with new information.
This enables faster user experiences because the browser doesn’t need to request an entirely new document or re-evaluate CSS and JavaScript assets for the next page. It also enables more dynamic user experiences with things like animation.
How Browser Navigation works?
Before diving deep into the React Router working, it is a better choice to go with how browsers navigate. Understanding the prerequisite will aid us in comprehending the intricacies of React Router.
Practical Experiment: Click and hold the back button of your browser tab. What do you see?
You see the history of the tab you are currently on. History of the URLs the tab has gone through. In the below illustration the tab has been gone through:
- https://google.com
- https://www.google.com/search?q=nodejs
- https://nodejs.org/en
- https://nodejs.org/en/download/package-manager

Browsers maintain their own history stack as a user navigates around. That’s how the back and forward buttons can work. In a traditional website (HTML documents without JavaScript) the browser will make requests to the server every time the user clicks a link, submits a form, or clicks the back and forward buttons.
TODO: Open Chrome DevTools and type history in the console and hit enter. You can see a History object with some properties and methods.These properties and methods are self-explanatory given the premise you have gone through the above content. length being the size of the history stack. back, forward, and go functions are used to navigate to one history step back, one history step ahead, and ‘n’ steps back or forth respectively. pushState and replaceState are used to modify the session history. pushState adds another entry into the history stack and replaceState modifies the current history item. Learn more
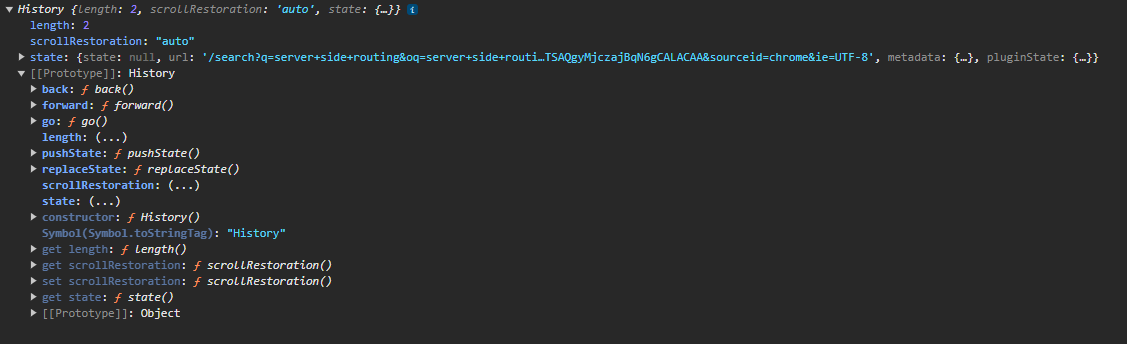
length, back, forward, go:
For example, the current history stack be:
https://example.com/learn/react
and the current URL be: https://example.com/learn/react/react-router
history.length === 3
history.back() https://example.com/learn/react
history.forward() https://example.com/learn/react/react-router
history.go(-2) https://example.com/learn
history.go(n) – if n is positive then it will go forward ‘n’ history items, n is negative then it will go back ‘n’ history steps, and if not provided or 0 then it will reload the page.
pushState, replaceState:
Let the current URL be https://example.com/learn and the history be:
history.pushState({}, undefined, ‘/learn/react’) – modifies the current URL in the browser to https://example.com/learn/react and places an entry onto the stack. The latest history snapshot is:
But remember, history.pushState({}, undefined, ‘/learn/react’) doesn’t execute the URL, it only places the URL in the browser and pushes an entry onto the history stack. The browser will not load the page. Because there is no event in the History API, to which a client program can listen, and once the change in the URL has been confirmed the URL will execute. This is something for which React Router has its own wrapper around the History API.
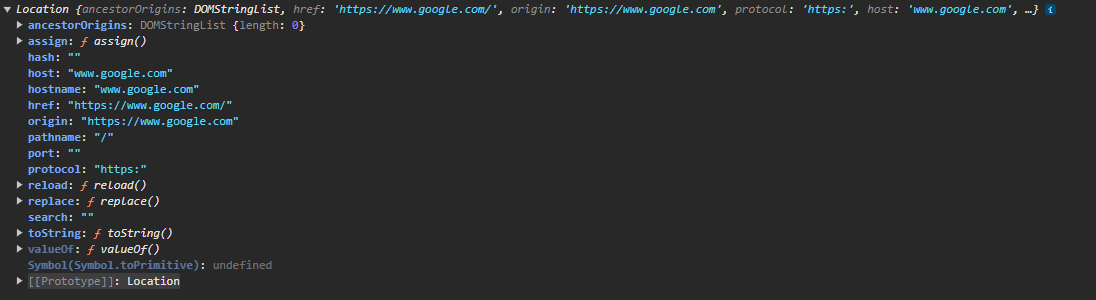
Though the history API provides us with sufficient information about the links we have gone through, but It doesn’t provide us with an interface for reading and manipulating the current URL. We need another API, which does exactly the same. So we have a Location API.
TODO: Type location in the DevTools console. A Location object will show up, which contains some properties and methods used for reading the current URL and manipulating the navigation. It contains the host, pathname, hash, and many more properties which can help in reading the current URL. reload, replace, and assign can be used to manipulate the current URL. So Location API comes handy in reading and manipulation the current URL, rather than dealing with the visited URL that is History Stack. Learn more
So far we have understood:
- What server side routing is,
- What client side routing is,
- What History API is, and
- What Location API is.
React Router
In React Router we define routes. These routes are used to render components based on the current URL. This works by mapping the routes to components. Let’s understand deeply with an example. Suppose we have defined routes in our application as below:
<Routes>
<Route path=”/” element={<App />}>
<Route index element={<Home />} />
<Route path=”users” element={<Users />}>
<Route path=”:userId” element={<User />} />
<Route path=”:userId/edit” element={<EditUser />} />
<Route path=”new” element={<NewUserForm />} />
<Route/>
<Route/>
</Routes>
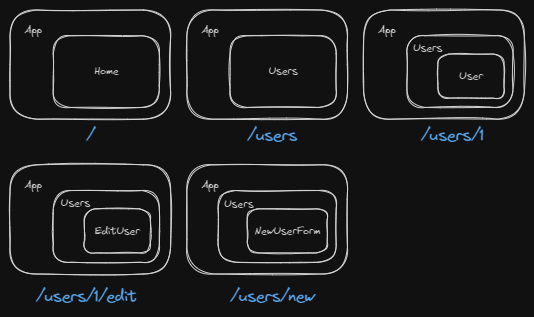
Each route path links to some combination of components. For example /users/1 links to <App/> with <Users/> as outlet and in-turn <User/> as outlet in <Users/>. For all the routes the possible combination of components is given below:
What React Router does is, it listens to the changes to the History and when the URL changes it matches the URL with the components.
Suppose the current URL is ‘/’ and the user clicks the link, which changes the URL to /users, React Router’s <BrowserRouter> listens to the change, and matches the URL (/users) with the appropriate components and renders the view onto the window. The flow is shown here:
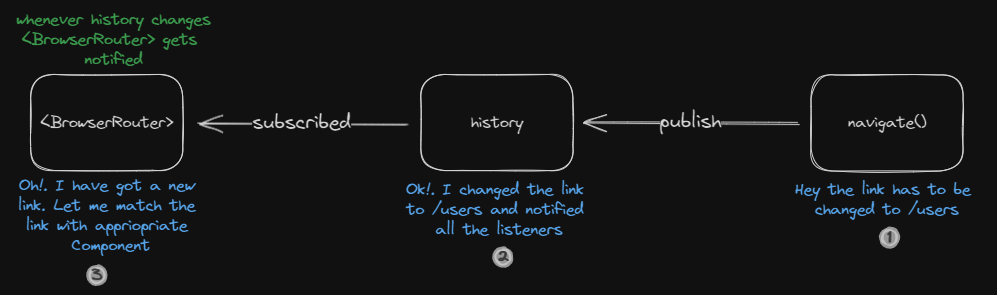
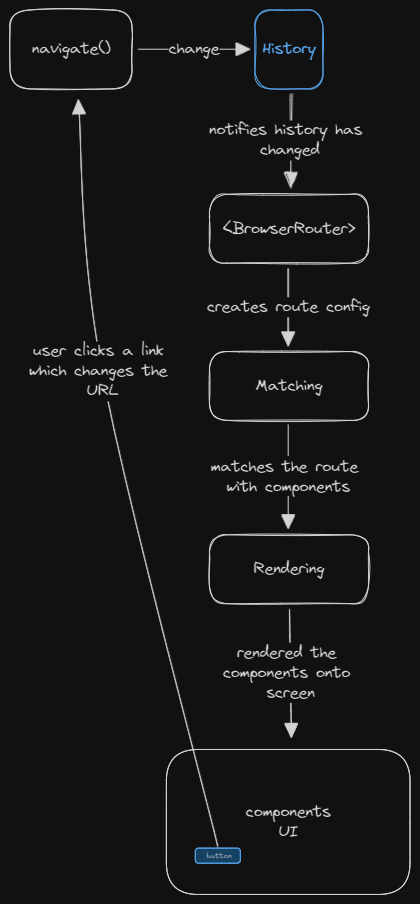
React Router’s <BrowserRouter> listens to the History, when this changes it matches the path with appropriate components and renders them. The flow of this whole process is illustrated here below. For the first time an <App/> is rendered, <BrowserRouter> creates an instance of history and puts the initial location into state may be ‘/’. <Routes> build the route config, it is an object which is created from the routes we define. There might be some <Outlet/> in the <App/> with path ‘/’ that is rendered.
User clicks a link, the navigate() function is called and it changes the history stack, by pushing another entry onto it. <BrowserRouter>, which is always listening to the history, gets the latest route and matches the appropriate components and renders them. This whole process continues and it is how the react router works. 🤩
Conclusion:
React Router does 3 main jobs:
- Subscribing to the history stack
- Matching the URL to the routes
- Rendering a nested UI
Note: The Browser native History API doesn’t have an event to which a client can listen for changes. So React Router has its own History API which does provide that which is lacking in the native one.